Use JumpCloud SAML Single Sign On (SSO) to give your users convenient but secure access to all their web applications with a single set of credentials. Automatically provision, update and deprovision users and groups in Splashtop from JumpCloud using the Identity Management (SCIM) integration. Leverage this integration to centralize user lifecycle, user identity, and group management in JumpCloud for Splashtop. Save time and avoid mistakes, as well as potential security risks, related to manually creating users.
Read this article to learn how to setup the Splashtop integration.
Prerequisites
- A JumpCloud administrator account
- JumpCloud SSO Package or higher or SSO à la carte option
- A Splashtop account with the Owner role
- A Splashtop Enterprise Plan
Important Considerations
- SSO is required for Identity Management. Contact Splashtop to subscribe to the SSO feature.
- If you need to update your token, you must deactivate the IdM integration, update the token, and then reactivate the IdM integration.
- Users who are suspended or have been removed from all user groups associated with the Splashtop integration in JumpCloud will still show as ‘active’ in Splashtop. These users will no longer be synced though.
- Deleting a user who is part of one or more groups associated with Splashtop in JumpCloud will also delete the user in Splashtop.
- We recommend adding a user to only one Splashtop managed group in JumpCloud, because a user can’t be a member of multiple synced groups in Splashtop. If a user is a member of more than one group managed by JumpCloud, the user will only be added to the most recently created JumpCloud managed group. If the most recently created JumpCloud managed group is deleted, the user will be moved to the second most recently created JumpCloud managed group of which the user is a member, and so on. If all JumpCloud managed groups of which a user is a member are deleted, the user will be added to the default group in Splashtop and remain active, but will no longer be managed by JumpCloud.
- Users cannot be filtered by email.
- The HTTP PATCH method is not supported.
- The HTTP DELETE method works as a “hard delete” and wipes the user from the account.The same happens with groups
- The HTTP PUT method doesn’t support the update of the “activate” user attribute, therefore when the user is deactivated in JumpCloud it will still appear as activate in the Splashtop account but the user won’t be updated or managed from JumpCloud unless it’s reactivated by the admin.
Attribute Considerations
A default set of attributes are managed for users. See the Attribute Mappings section for more details.
- You must add a constant attribute ssoName to the SSO configuration in JumpCloud. The value must match the SSO Name value set in Splashtop. This value will be passed as a user attribute. Users and groups can’t be provisioned without this value.
Creating a new JumpCloud Application Integration
- Log in to the JumpCloud Admin Portal.
- Navigate to USER AUTHENTICATION > SSO Applications.
- Click + Add New Application.
- Type the name of the application in the Search field and select it.
- Click Next.
- In the Display Label, type your name for the application. Optionally, you can enter a Description, adjust the User Portal Image and choose to hide or Show in User Portal.
![]()
If this is a Bookmark Application, enter your sign-in URL in the Bookmark URL field.
- Optionally, expand Advanced Settings to specify a value for the SSO IdP URL. If no value is entered, it will default to https://sso.jumpcloud.com/saml2/<applicationname>.
![]()
The SSO IdP URL is not editable after the application is created. You will have to delete and recreate the connector if you need to edit this field at a later time.
- Click Save Application.
- If successful, click:
- Configure Application and go to the next section
- Close to configure your new application at a later time
Configuring the SSO Integration
To configure JumpCloud
- Create a new application or select it from the Configured Applications list.
- The default values set in the SSO tab contain all the necessary configuration details.
- IDP URL can be customized or kept as the default.
- If you want to do a service-provider initiated SSO flow, enter jumpcloud-login in the Default RelayState field.
- Click save.
Download the certificate
- Find your application in the Configured Applications list and click anywhere in the row to reopen its configuration window.
- Select the SSO tab and click IDP Certificate Valid > Download certificate.
![]()
The certificate.pem will download to your local Downloads folder.
Download the JumpCloud metadata file
- Find your application in the Configured Applications list and click anywhere in the row to reopen its configuration window.
- Select the SSO tab and click Export Metadata.
- The JumpCloud-<applicationname>-metadata.xml will be exported to your local Downloads folder.
![]()
Metadata can also be downloaded from the Configured Applications list. Search for and select the application in the list and then click Export Metadata in the top right corner of the window.
To configure Splashtop
![]()
For more information on configuring JumpCloud for SSO with Splashtop see Splashtop’s SSO setup - JumpCloud (SAML 2.0) documentation.
- Log in to the Splashtop portal.
- From the top navigation bar, select Management > Settings.
- From the left navigation bar of the Settings page, select Team.
- Scroll down to the Single Sign On section.
- Click Apply for new SSO method. Learn more about this in Splashtop’s How to Apply for a New SSO Method documentation.
- Enter an SSO Name.
- Select JumpCloud for IDP Type.
- Leave SAML 2.0 as the Protocol.
- Use the metadata import option at the bottom of the form to automatically populate the IDP SSO Login URL, IDP Issuer, and X.509 Certificate values.
- Select Upload an XML file.
- Click Choose an XML file.
- Upload the metadata file you downloaded from the JumpCloud administrator portal.
- Click Import.
- Clear the certificate information from the X.509 Certificate field. You will need to replace the certificate value, because it must be enclosed in —–BEGIN CERTIFICATE—– and —–END CERTIFICATE—–.
- Open the certificate.pem file you downloaded from the JumpCloud admin portal and copy all the file contents
- Paste the contents from the certificate file in X.509 Certificate field.
- Enter your whitelisted domain(s), which are the domains for the users you want to provision within Splashtop.
- Click Save.
- The Splashtop validation team will verify the SSO method information you entered. It may take 1-2 business days to complete the validation. The SSO method will remain in a pending status until the validation is complete.
- You will receive an email to verify your domain(s). Follow the instructions in the email to complete the process.
- Once your SSO method is validated and domain(s) verified, your SSO configuration is complete.
Authorizing User SSO Access
Users are implicitly denied access to applications. After you connect an application to JumpCloud, you need to authorize user access to that application. You can authorize user access from the Application Configuration panel or from the Groups Configuration panel.
To authorize user access from the Application Configuration panel
- Log in to the JumpCloud Admin Portal.
- Go to USER AUTHENTICATION > SSO Applications, then select the application to which you want to authorize user access.
- Select the User Groups tab. If you need to create a new group of users, see Get Started: User Groups.
- Select the check box next to the group of users you want to give access.
- Click save.
To learn how to authorize user access from the Groups Configuration panel, see Authorize Users to an SSO Application.
Validating SSO authentication workflow(s)
IdP-initiated
- Access the JumpCloud User Console
- Select the application’s tile
- The application will launch and login the user
SP-initiated
- Navigate to your Service Provider application URL
- You will be redirected to log in to the JumpCloud User Portal
- The browser will be redirected back to the application and be automatically logged in
Configuring the Identity Management Integration
To configure SplashTop
- Log into Splashtop portal.
- Go to Management > Settings > Teams tab.
- Scroll down to the SCIM Provisioning Token section.
- Click the Set up an API token link.
- Click Generate.
- Copy the generated token.
![]()
The Client ID and Secret (token) may only be shown once. Copy them to a secure location, like the JumpCloud Password Manager, for future reference.
To configure JumpCloud
- Create a new application or select it from the Configured Applications list.
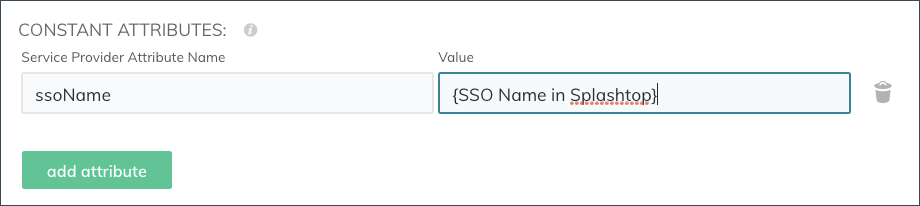
- Select the SSO tab and scroll down to Constant Attributes.
- If you don’t have an ssoName constant attribute defined in the SSO configuration:
- Click add attribute.
- In the Service Provider Attribute Name field, enter ssoName.
- In the Value field, enter the value you set for SSO Name in Splashtop.
- Click save.
- Select the Identity Management tab.
- By default, Group Management is enabled. Deselect Click Enable management of User Groups and Group Membership in this application if you don’t want to provision, manage, and sync groups.
- In the Configuration Settings section, click Configure.
- In the Token Key field, paste the token generated in the previous section.
- Click Activate.
- If successful, you will receive a confirmation that the Identity Management integration has been successfully verified and a Public Certificate is created.
Attribute Mappings
The following table lists attributes that JumpCloud sends to the application. See Attribute Considerations for more information regarding attribute mapping considerations.
Learn about JumpCloud Properties and how they work with system users in our API.
Splashtop User Attributes
| JumpCloud Property | JumpCloud UI | SCIM v2 Mapping | Splashtop Value |
|---|---|---|---|
| Company Email | emails: value | emails: value | |
| Company Email | userName | userName | |
| firstname/lastname | First Name/Last Name | name.formatted | name.formatted |
| firstname/lastname | First Name/Last Name | displayName | displayName |
| firstname | First Name | name.givenName | name.givenName |
| lastname | Last Name | name.familyName | name.familyName |
| employeeIdentifier | Employee ID | externalId | externalId |
Group Attributes
| JumpCloud Property | JumpCloud UI Field Name | SCIM v2 Mapping | Application Value |
|---|---|---|---|
| name | Name | displayName | Name |
Group Management Considerations
Enabling Group Management
You must select the Enable management of User Groups and Group Membership in this application option to manage groups and group membership in the application from JumpCloud.
Group Provisioning and Syncing
- Empty groups are not created.
- JumpCloud takes over management of existing groups in the application when the user group name in JumpCloud matches the name of the group in the application.
- All user groups associated with the application in JumpCloud are synced. Syncing occurs whenever there is a membership or group change event.
- Group renaming is supported.
- If a user group is disassociated from the application in JumpCloud, syncing immediately stops and the group is left as-is in the application. All members of that user group are deactivated in the application unless they are associated with another active application group that is managed from JumpCloud.
Group Deletion
- Managed groups deleted in JumpCloud are deleted in the application.
- All members of the deleted group are deactivated in the application, unless they are associated with another active application group that is managed from JumpCloud.
Disabling Group Management
- You can disable group and group membership management by unchecking the Enable management of User Groups and Group Membership in this application option.
- The managed groups and group membership are left as-is in the application.
- JumpCloud stops sending group membership information for the user, but the user’s identity will continue to be managed from JumpCloud.
Importing Users
This functionality is helpful if users have already been created in the application but have not been created in JumpCloud.
- Log in to the JumpCloud Admin Portal.
- Go to USER AUTHENTICATION > SSO Applications.
- Search for the application and click to open its configuration panel.
- Select the Identity Management tab.
- Click manual import.
- Select the users you want to create in JumpCloud from the application from the list of users that appear. Users in the list have two import statuses:
- New – user has not been imported.
- Imported – user has been imported and has an account in JumpCloud.
![]()
Tip: Try using the New Users-only filter when selecting users to import. This will move all of your new users to the top of the list, making them easier to identify and select.
- Click import.
- If you are importing less than 100 users, your import results will display in real time and you can continue onboarding your users.
- If you have more than 100 users being imported, JumpCloud will send you an email when your import is complete.
- You can now connect and grant users access to all their JumpCloud resources. Learn more in the Authorize Users to an Application and Connecting Users to Resources articles.
![]()
Warning: Imported users must be members of a user group bound to an application for JumpCloud to manage their identity in, and access to, the application.
SCIM Directory Insights Events
The following Directory Insights (DI) events provide visibility into failures and detailed information about the user and group data being added or updated from HR or other external solutions to JumpCloud.
![]()
Customers with no package or the Device Management Package will need to add the Directory Insights à la carte option. Directory Insights is included in all other packages.
SCIM DI Integration Events
| Event Name | Event Description |
|---|---|
| idm_integration_activate | Logged when an IT admin attempts to activated new SCIM Identity Management integration. |
| idm_integration_update | Logged when an IT admin attempts to update a configured and activated SCIM Identity Management integration. |
| idm_integration_reauth | Logged when an IT admin attempts to change the credentials for an activated SCIM Identity Management integration. |
| idm_integration_delete | Logged when an IT admin attempts to deactivate an activated SCIM Identity Management integration. |
SCIM DI User Events
| Event Name | Event Description |
|---|---|
| user_create_provision | Logged when JumpCloud tries to create a new user in service provider application. |
| user_update_provision | Logged when JumpCloud tries to update an existing user in service provider application. |
| user_deprovision | Logged when JumpCloud tries to change an existing user to inactive in the service provider application. |
| user_delete_provision | Logged when JumpCloud tries to delete an existing user in service provider application. |
| user_lookup_provision | Logged when JumpCloud encounters an issue when trying to lookup a user to determine if the user needs to be created or updated. |
If SCIM Groups are supported:
SCIM DI Group Events
| Event Name | Event Description |
|---|---|
| group_create_provision | Logged when JumpCloud tries to create a new group in service provider application. |
| group_update_provision | Logged when JumpCloud tries to update an existing group in service provider application. |
| group_delete_provision | Logged when JumpCloud tries to delete an existing group in service provider application. |
Removing the Integration
![]()
These are steps for removing the integration in JumpCloud. Consult your SP's documentation for any additional steps needed to remove the integration in the SP. Failure to remove the integration successfully for both the SP and JumpCloud may result in users losing access to the application.
To deactivate the IdM Integration
- Log in to the JumpCloud Admin Portal.
- Go to USER AUTHENTICATION > SSO Applications.
- Search for the application that you’d like to deactivate and click to open its details panel.
- Under the company name and logo on the left hand panel, click the Deactivate IdM connection link.
- Click confirm.
- If successful, you will receive a confirmation message.
To deactivate the SSO Integration or Bookmark
- Log in to the JumpCloud Admin Portal.
- Go to USER AUTHENTICATION > SSO Applications.
- Search for the application that you’d like to deactivate and click to open its details panel.
- Select the SSO or Bookmark tab.
- Scroll to the bottom of the configuration.
- Click Deactivate SSO or Deactivate Bookmark.
- Click save.
- If successful, you will receive a confirmation message.
To delete the application
- Log in to the JumpCloud Admin Portal.
- Go to USER AUTHENTICATION > SSO Applications.
- Search for the application that you’d like to delete.
- Check the box next to the application to select it.
- Click Delete.
- Enter the number of the applications you are deleting
- Click Delete Application.
- If successful, you will see an application deletion confirmation notification.